Carbon Fiber - create in 5 minutes
High contrast websites often use carbon fiber as a background. It really gives an aesthetic look to the website. We can find lots of free download carbon fibers available on the internet. But most of those because of solid layers & blah & blah, are hard to use. In this micro-tuts I will show you how to create a carbon fiber within just 5 minutes.
Origin of Idea: Recently I had been requested to use carbon fiber in header of a website, so I hit the internet & found one. That was in black color, & in solid layer. When I changed color I got the plain solid fill with my color. So I came up with the idea to create a new one for me, so as sharing my idea to overcome free download.
It took me only 5 minutes. Can't believe?
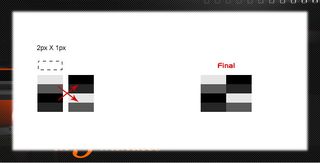
Follow the steps below to create Carbon Fiber in 5 minutes:
a.) Fire Photoshop & create new document (Ctrl/CMD + N) of 4px by 4px.
b.) Press M (for marquee tool), create a selection of 2px by 1px. See image above.
c.) Fill with black. Now press 1 (Just 1) to set its opacity to 10%. Rename this layer to "10"
d.) Duplicate the layer > press Ctrl/CMD + J. Place this new layer just down the first layer. Now press 65 (Press 6 & then 5 but quickly) to set opacity at 65%. Rename this layer to "65"
e.) Repeat the action above & press 0 to set opacity at 100%. Rename layer to "100"
f.) Again repeat the action no. d. & set opacity to 95. You know what to name this layer, absolutely "95".
g.) All set, just more steps. Lets review what we have done till now, we have four layers having opacity of 10, 65 , 100 & 95% respectively. Make sure that you are along with me.
h.) Now Copy first two layers (10 & 65) & place it just right side to the 100% 95 layer.
i.) Now copy the third & fourth layer (100 & 95 ) & place this to right side & align to top of 10 & 65 layers. Align the right side of 10 & 65 width 100 & 95, also align to bottom.
Now we have filled our 4 by 4 document. Carbon fiber is ready to be exported as patterns. Press Ctrl/CMD + A to select whole document & go to "Edit" menu & choose "Define pattern" > Give the name "Carbon-Fiber" & hit OK.
Now carbon fiber, you just created before, is ready to use. It is in the patterns gallery of Photoshop.
That's it. No downloads available, because it is well known that you can create one for yourself. If you have similar ideas or more quick idea, teach me in the comments below.